Electronic Concepts, Electronics Tutorials
Polarity in DC Power Supplies
What does it mean when you read that your pedal needs a negative power supply? Does it matter if you use a 18V power supply in a 9V pedal? And if you use a 500mA one in a 100mA pedal? Understanding polarity and power specs of your gear is a very important aspect, as using the wrong one could go very wrong: your pedals could go from malfunctioning to getting damaged!
1 – Introduction
Let’s be honest: powering your pedals seems like it should be the simplest part of setting up your gear. You just plug it in and go, right? Not quite.
If you’ve ever fried a pedal (or panicked thinking you might have), chances are polarity had something to do with it. Whether you’re building your first pedalboard or trying to clean up an old setup, understanding how polarity, voltage, and current all work together is absolutely essential. It might sound technical, but once you get the basics, it’s really not that complicated.
Let’s break it down.
2 – What Is Polarity, Anyway?
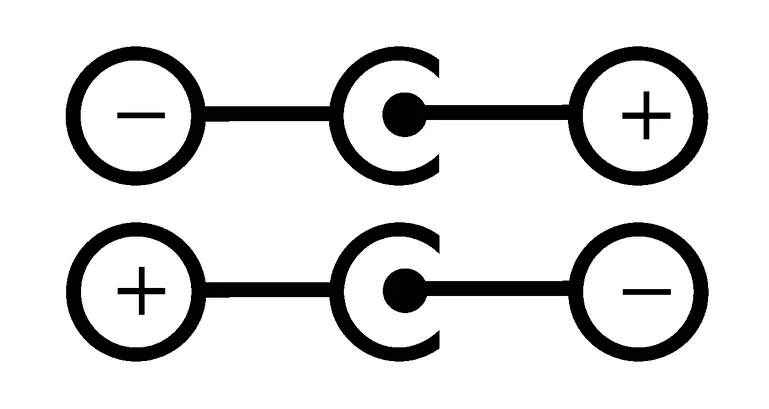
The plug of a power supply for effect pedals has two connectors, one on the inside and one on the outside. Depending on how it’s wired, either of those can be the positive or negative terminal. Think of it like this: electricity only flows in one direction, and you have to make sure everything is lined up correctly or the pedal just won’t work—or worse, it’ll get damaged.
This is what a DC power supply plug typically look like:

When refering to a DC power supply, polarity simply refers to which part of the plug is positive and which is negative. That’s where “center-negative” and “center-positive” come in. But as “center-negative” and “center-positive” is a bit too long, they are most commonly referred as “negative” and “positive” power supply
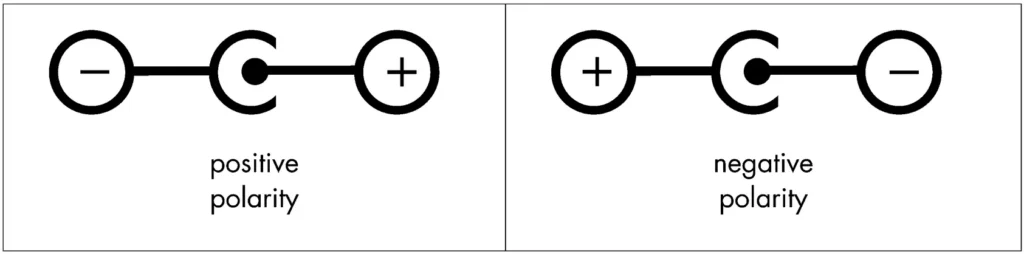
In power supplies, this polarity is specified by a small drawing:
3 – What Does This Mean for Guitar Pedals?
Most guitar pedals, especially the classic ones like Boss or MXR, use center-negative polarity. That means the center pin is negative, and the outer ring is positive. It’s become sort of a standard across the industry, but it’s not universal. All our kits, PCBs and pedals are designed to work with center-negative power supplies.
Some boutique pedals, or specific brands, might flip things around and use center-positive. This is especially true for older fuzz pedals or digital pedals from smaller companies. So, just because one pedal uses center-negative doesn’t mean they all do. Always double-check!
4 – What Happens If You Get Polarity Wrong?
Short answer? Nothing good.
In the best case, your pedal just doesn’t turn on. That might mean it has a diode or circuit that prevents damage. But in the worst case, the pedal’s internal components can fry—especially if it’s a digital pedal or one that draws a lot of current.
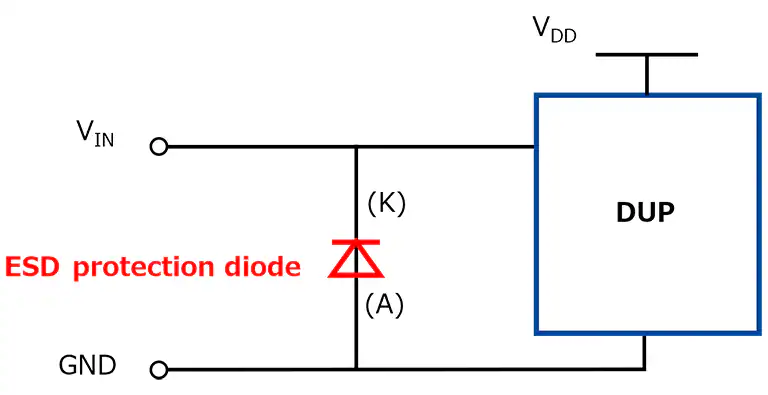
In all our kits and PCBs, we include an inverted polarity protection diode that should help if the wrong power supply is connected. But even with protections included, depending on the amount of current, the design of the circuit and other factors, even these precautions can’t avoid damage to the circuitry.
And the worst part? Sometimes you won’t even know it right away. A pedal might seem fine at first, but a wrong polarity connection could quietly cause damage over time.
5 – Let’s Talk Voltage and Current
Alright, time to get into another two important terms: voltage and current.
Let’s start with voltage. Voltage is like the pressure behind the electricity. Most pedals are made to run on 9 volts, but some need 12V, 18V, or even more—especially if they’re digital or high-headroom effects like certain reverbs or delays. Some pedals, like our Samurai Clean Booster, use a 9V power supply but they internally turn it into more voltage (18V in this case) for extra headroom. Others, like some versions of the Klon Centaur, can take multiple DC values, like 9V and 18V.
The key thing is this: you should always match the voltage exactly. Don’t guess or “get close”—if a pedal says 9V, it needs 9V. Giving it more could damage it, and giving it less probably won’t work.
You should also pay attention to the input voltage your power supply can handle. If you’re buying it locally, chances are it’s already designed to work with your country’s wall voltage, so you’re probably fine. But if you’re ordering from overseas—especially from websites that ship internationally—it’s really important to check that the power supply supports the voltage of your local power grid. Not all of them are universal, and plugging the wrong one into the wall could kill the power supply before it even gets near your pedals.
Then we get into current. Now, current (which is measured in milliamps, or mA) is a little more flexible. Think of it like the amount of electricity the pedal wants to pull in. If your pedal needs 100mA, your power supply needs to be able to give it at least that much. More is totally fine—your pedal won’t draw extra just because it’s there. Less, on the other hand, can lead to weird glitches, noise, or the pedal just not turning on at all.
If you want to dive deeper into voltage, current and how they are linked,
don’t miss our Electronic Basic Concepts post!
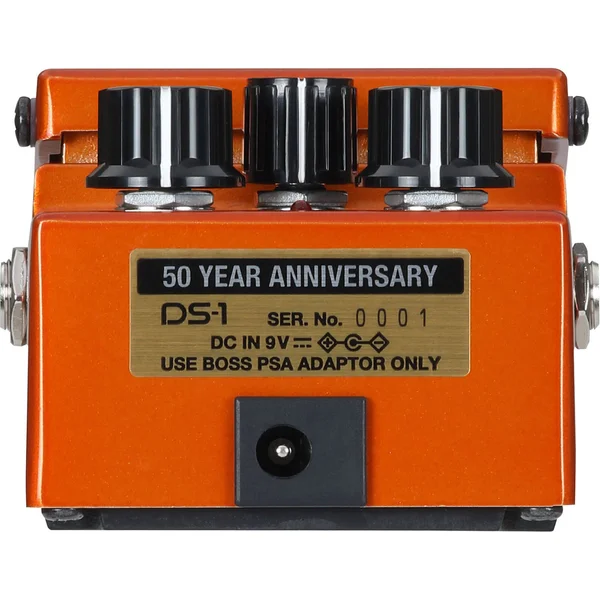
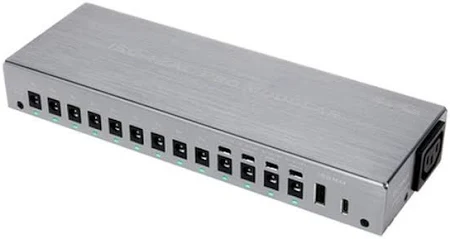
Let’s take the example of the previous picture. The key parameters we need to check are:
- Input voltage of the supply: within 100 and 240VAC, which means that it will work in most electrical power grids
- Output voltage: 9VDC
(NOTE: usually, you’ll see input voltage as VAC and output voltage as VDC. This is because the power that comes from your wall is Alternating Current, while the one coming out of the power supply is Direct Current) - Output current: 1.6A (= 1600mA)
- Polarity: center-negative
6 – What About Powering Multiple Pedals?
If you’ve got a few pedals, you have two main options. You can either daisy chain them all from one adapter, or use a power supply with multiple outputs.
A. Daisy-chain
Daisy chaining works for simple setups, but the main drawback is that it can cause issues, mainly noise. Digital pedals are the main culprits here, as they need clocks to work that can send some of these oscillations back to the power line, where it travels to every other pedal directly connected to it. This translates into hums or high pitches, and is very setup-dependent.

If you decide to go for daisy-chaining, you need to make sure that:
- All the pedals connected need the same voltage
- The sum of the currents of all the pedals connected is smaller than the current available from the DC power supply
B. Multi-output power supply
Multi-output power supplies are a great option because they offer isolated outputs. That means each pedal gets clean, separate power, which helps eliminate hum and interference. Every output acts as a separate power supply. You only need to check that the available current is higher than your pedal current, and that the voltages match.
Some of these power bricks also let you switch between voltages on each output, which is super handy if you’ve got a mix of 9V and 18V pedals. Just make sure you’re not trying to power a 300mA pedal from a 100mA output—that’s where things can go sideways.
7 – Wrapping it up
9. Wrapping It Up
Polarity might sound like a tiny technical detail, but in the world of effect pedals, it’s a pretty big deal. Knowing the difference between center-negative and center-positive, matching voltage properly, and making sure your power supply can handle your pedals’ current needs it’s all part of getting great sound without the risk.
It’s the kind of thing that once you understand it, you’ll never overlook again. And it’ll save you from fried pedals, bad tone, and troubleshooting headaches down the road.
Keep your setup clean, double-check your connections, and take a minute to understand what your gear actually needs. Your pedalboard will thank you!